How To Add Corner Roof Flashing

Pin On Back Porch

Pin On Home Building Repair Or Rebuild

Pin On Construction

Pin On Cool
Pin On Roofs

Pin On Home Improvement
Next place your vent flashing on top of the membrane.
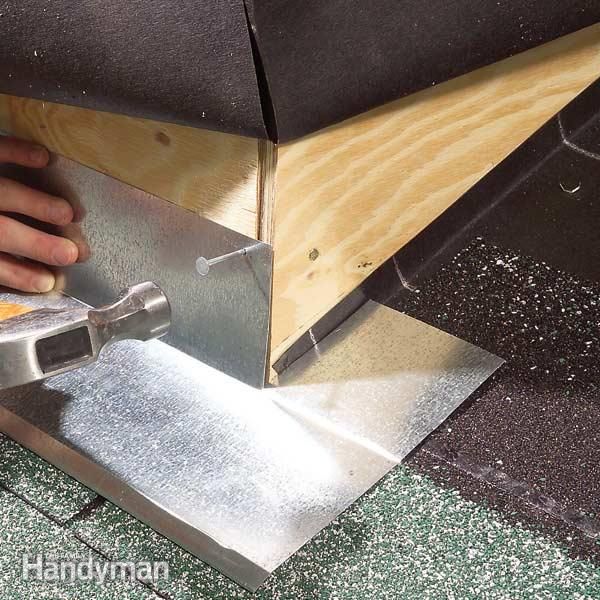
How to add corner roof flashing. There are two good ways to handle corner flashing. Run the base flashing 4 to 5 in. Ensure it sits flat and extends at least 8 inches above the shingles. The first bending two pieces and caulking the joint photos 1 3 is the most common because you can do it on the spot with the flashing at hand.
Most flashing is 8 inches wide. Then nail the new l shaped flashing under the builder s felt but above the fascia board. Nail it in place with two nails one. 3 mark the flashing at the corner using a.
Hammer one nail to the. Apply a thin bead of silicone around the opening of the vent pipe area and lay the membrane in place. Bend it back so that it overlaps the corner flashing. Then set the piece down.
Use roofing nails to install the l shaped flashing flush with the roof and wall then cover it with roofing cement and reattach the roofer s felt. Beyond the dormer and cut the top section along the dormer edge. 4 inches should go up the house wall and 4 inches should go on top of the porch roof shingles. Move the piece of wall or roof edge flashing either way as necessary so one end extends 16 inches beyond the corner of the wall or the roof sheathing.
Step 6 make a 10 degree bend on the shingle edge of the flashing approximately 1 2 inch from the edge. How to install step flashing with a wall corner step three. Use the metal break tool to bend the flashing lengthwise in the middle according to the angle of the roof joint. Begin by removing the shingles at the affected area and removing old flashing if present.

Pin On Roof

Pin On Building Science

Pin On How To Shingle A Roof

13 Simple Vinyl Siding Installation Tips Vinyl Siding Installation Installing Siding Vinyl Siding

Pin On Construction

Pin On House

Pin On Home Improvment

Pin On Entry

Pin On Yard Ideas

Pin On Your Pinterest Likes

Pin On Roofing

How To Re Shingle A Roof And Not Die Diy Roofing Roofing Home Improvement Projects

Pin On Roof

Pin On Construction Techniques

Details That Matter On Asphalt Shingle Roofs Roof Installation Roof Shingles Fibreglass Roof

Pin On Informative

Home Construction Bay Window Roofing Bow Window

Pin On House Addition
Https Encrypted Tbn0 Gstatic Com Images Q Tbn 3aand9gcqfwuteol9cqcfhrvz4ubixixg8klwbqrunasts9ammzo2vd5m6 Usqp Cau

How Should The Gutters Be Installed On A Huge Gable Dormer House Gutters Dormers Gutters

Gutter Replacement How To Install Gutters How To Install Gutters Diy Gutters Home Repair

Xactimate Line Item Of The Day Ice And Water Shield Rfg Iws Standard Calculation Val 3 Note 1 In The Vall Roof Framing Roofing Construction Remodeling

Roof Rain Diverter Rain Diverter Rain Barrel Gutters

Curb Appeal Boosts For Every Budget Curb Appeal Flat Roof Repair Flat Roof House

Pin On Building

021252072 Dormers Shed Dormer Building A House

Roof Valley Rain Water Diverter Tests Gutter Drainage Rain Water Collection System Gutters

Metal Standing Seam Roof With Concealed Gutter Corner Condition 2 Standing Seam Roof Zinc Roof Standing Seam Metal Roof

Installing A Ledger On Stucco Stucco Siding Stucco Homes Stucco

Low Maintenance Aluminum Soffit Fascia And Seamless Gutters House Exterior Exterior Remodel Soffit Ideas

Standing Seam Metal Roof On Dormer Design Ideas Amp Pictures Standing Seam Metal Roof Standing Seam Metal Roof Cost

Pin On Berridge Manufacturing Videos


Pin On Victorian Farmhouse

Dmr Gutters Unusual Gutter Fabrication Photopage Gutters Gutter Drainage House Gutters

How To Install Metal Roof Rake Trim For Union S Masterrib Panel Metal Roof Installation Metal Roof Houses Roof Installation

Pin On Idei Pentru Grădină

Roof Leak Repair Tips Bob Vila Roof Leak Repair Roof Repair Roof Problems

Shingling A Valley Roof Repair Diy Roofing Roofing

Blog Archive Seattle Builder A Nice Siding System House Cladding House Siding Modern Siding

Metal Coping Miters The Picture Shows Complicates Detail Of Metal Coping Backyard Fences Modern Fence Fence Landscaping

Parapet Capping In Aluminium Now Being Installed New House At Knocknagoug Quin Co Clare Wooden Cladding Exterior Roof Design Flat Roof Construction

