How To Brace A Large Roof System For Shear

Zont Bracing Installation

Typical Shear Wall Earthquake Retrofit Landscape Construction Wall

Image Result For High Wind Framing Hurricane Proof House Single Story Homes Roof

Pin On Architectural Details

What Are The Different Types Of Bracing Steel Structure Types Of Braces Different Types Of Braces

Posts About Uncategorized On Kalamazoo Zero Energy Ready Home Mobile Home Mobile Home Exteriors Building A House

The swenson shear stone coat cutter is designed for use on a multitude of metal roof applications from stone coated metal shake and shingles to 14 gauge stainless flat sheets.
How to brace a large roof system for shear. Step 3 brace first truss to ground. Generally a brace connection such as the simple shear connection for an infill beam that is located within the one third depth of the beam web that is closest to the compression flange can be considered to provide. However when it comes to installing an expansion joint filler the joint system must now be capable of handling the expected movements in shear at each jog in the run of the joint. Residential structures framing systems typically consist of the roof structure that supports the roof.
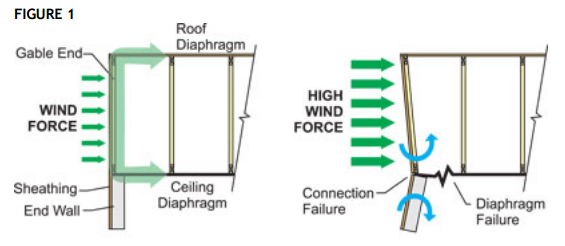
In order to keep those roofs and walls right where they re supposed to be a sturdy connection to a shearwall below is required. T profile strapping and l profile strapping are designed to be installed by inserting one leg of the strapping into a 1 2 in deep kerf cut into the studs and plates and then nailing the strapping to each stud and plate. A direct brace may be provided for a primary member by a properly attached floor system itself or by a secondary framing member. Wooden stud walls have to be properly shear braced with structural construction panels in accordance with the local code such as the international residential code.
Deck exterior and interior load bearing walls beams girders posts and floor framing. When wind or earthquake forces are applied to the house the floors and roofs want to move sideways. They work in both compression and tension. Walls supporting multiple stories have greater racking loads than those supporting only a roof.
The base and ridge bender is a combination tool used for bending stone coated steel to control water from blowing into the metal roof system. Nail braces vertically every 4 feet along the top and bottom of a gable truss. The diagram below shows a simple roof floor and wall relationship. The panels should be continuous from top to bottom.
Slide the rest of the truss up using a 2x4 as a ramp if necessary. Buildings in higher hazard areas with large design wind speeds or earthquake ground motions experience greater potential racking load. Lower story walls serve to. T profile and l profile strapping have an important advantage over flat strapping.
Install 2x4s at a 45 degree angle. The basic rule of thumb is to have a minimum of 4 of 7 16 osb on each corner and no less than 25 apart. The size of the building and how many stories are supported by a braced wall line. Shear walls or steel moment frames in homes with large windows or other large openings provide the strength to resist lateral loads.

Tension Strapping Shear Wall Bracing Clarkdietrich Building Systems Wall Building Systems Tension

Braced Frame Google Search Seismic Design Modern Architecture Building Structural Engineering

Steel Truss Lower Bottom Chord Lateral Bracing Restraint Detail Steel Trusses Steel Architecture Steel

02 120 0712 Framing Construction Masonry Steel Architecture

Www Modernbesthouse Com Loft Conversion Attic Conversion Loft Conversion Plans
Gable End Bracing Structural Building Components Association

Temporary Bracing The First Truss Jlc Online

Hardy Frame Shear Wall System Hfxpanel House Styles Wall Systems House Design

Steel Building Wall Section Brick Pinned By Www Modlar Com Pre Engineered Buildings Pre Engineered Steel Buildings Prefabricated Structures

If You Use Diagonal Steel T Bracing You May Be Able To Omit Structural Sheathing Like Osb Or Plywood Stud Walls Sheathing Metal Braces

Esdep Lecture Note Wg11 Steel Structure Buildings Green Roof Benefits Structural Engineering

Open Web Steel Joist Floor Framing Concrete Wood Concrete

Shear Connectors Shear Stud Connectors Stud Welding Thiết Kế Khung Thep

Pin On Structural Systems

Types Of Sections Can Carrying Shear Strength Steel Frame Construction Steel Architecture Steel Building Homes

Roof Steel Truss Column Overhang Connection Detail Steel Trusses Steel Columns Steel Roofing

Beam Bracing Archives Simpson Strong Tie Structural Engineering Blogsimpson Strong Tie Steel Architecture Steel Frame Construction Wood Details Architecture

Vertical Diagonal Chs X Bracing Corner Support Connection Vertical Diagonal Connection
Https Encrypted Tbn0 Gstatic Com Images Q Tbn 3aand9gcstnllvk934gdynmggzkcu0dha3stzezjilnrjrmf Bsw8atmir Usqp Cau

When Does The Code Require Parapets What Construction And Fire Resistance Requirements Exist For Parapets Woodworks

Section 8 Racking Bracing And Shear Forces Week Ppt Download

Heavy Timber And Steel Column Timber Architecture Timber Framing Timber Frame Homes

Typical Pre Engineered Buildings Roof Panels Pre Engineered Buildings Wall Paneling

Engineers Daily Free Engineering Database For Engineers How Buildings Resist Earthquakes Earthquake Building In This Moment
Reduced Size Steel Column Bolted Splice Connection Steel Columns Steel Trusses Steel Beams

Commercial Metal Roofing Superior Installation Vaillancourt Commercial Metal Roofing Metal Roof Roofing

Image Result For Average Size House Soffit Size Roofing Roofing Systems Restoration Services

Concrete Shear Wall Google Search Earthquake Building Structure Green Building

Pin By Meredith Huspeni On Addition Attic Truss Roof Sheathing Sheathing

Braced Frames Steelconstruction Info

Interlocking Tile Installation Roof Detail Pitched Roof Buy Solar Panels

By Toan Tong Steel Architecture Steel Storage Buildings Metal Building Homes

Shoring Is The Process Of Supporting A Building Vessel Structure Or Trench With Shores Props When In Dan Temporary Work Metal Props Structural Engineering

Easy Pole Barn Designs Post Frame Garage Plans Home Plans Home Design Pole Barn House Plans Building A Pole Barn Pole Barn Homes

5 12 Traditional Bolted Connections In Trusses Steel Trusses Beam Structure Steel Detail

ملتقى المهندسين العرب Wall Systems Skyscraper Concrete

Cripple Wall Bracing Glendale Ca Seismic Safety Inc Earthquake Retrofit Seismic Seismic Design

Wood Strong Wall Shearwall Wood Architecture Building

Strap Hung Molded Gutter Gutters Diy Gutters How To Install Gutters

The South Eastern End Of The House With Its Cor Ten Cladding And Projecting Roof Form Are Reminiscent Of The Ships Which Architecture Cladding House

Pin On New House

Barn Kit Prices Stroud S Building Supply Morganton Nc Diy Pole Barn Building A Pole Barn Pole Barn

