How To Bring Walls Up To Slanted Roof Revit

How To Create A Thatch Roof In Revit Micrographics Thatched Roof Thatch Roof

Wall By Face Part 2 Creating A Slanted Wall Tool Wall Create Face

Webinar 2 Creating Masses In Revit Youtube Archdesignlabs Revit Tutorial Autodesk Revit Mass

Trapezoidal Wall Cladding Wall Cladding Cladding Revit Architecture

How Can I Attach A Curved Curtain Wall To A Sloped Roof Autodesk Community Revit Products

Revit Sloped Glazing Youtube
Now use the wall by face command and select a wall type from the type selector.
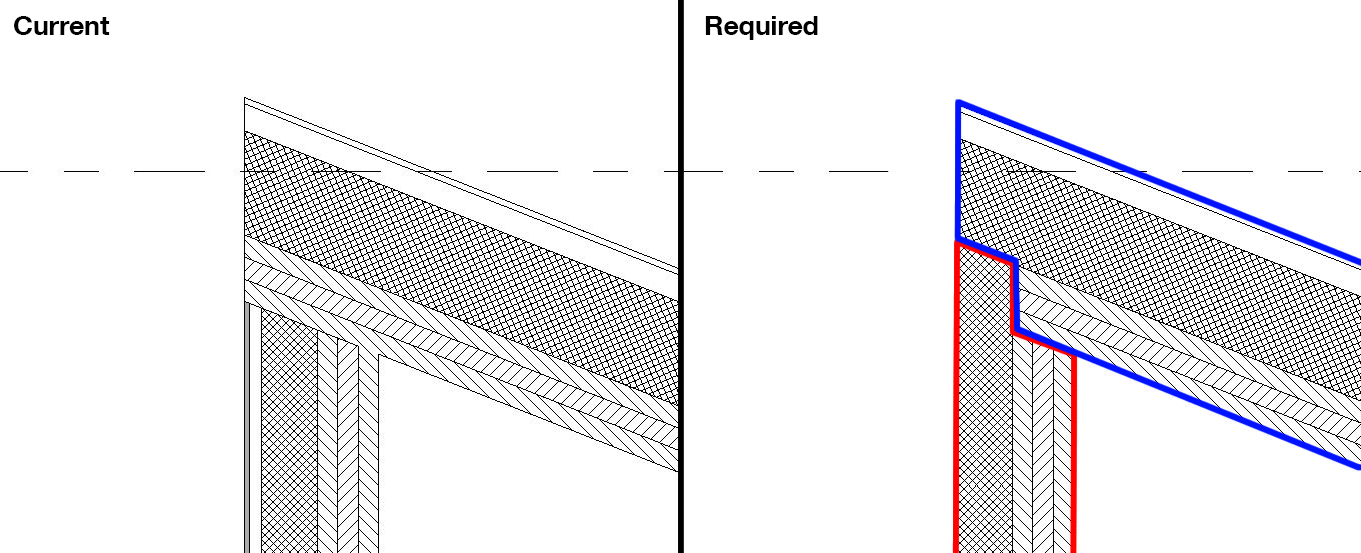
How to bring walls up to slanted roof revit. All you need to do is to select the wall and then click on the attach top base tool that appears at the right end of the ribbon. Select the individual elements from which to detach the walls. 1 check define slope to create a sloped roof. Define wall as a category 3.
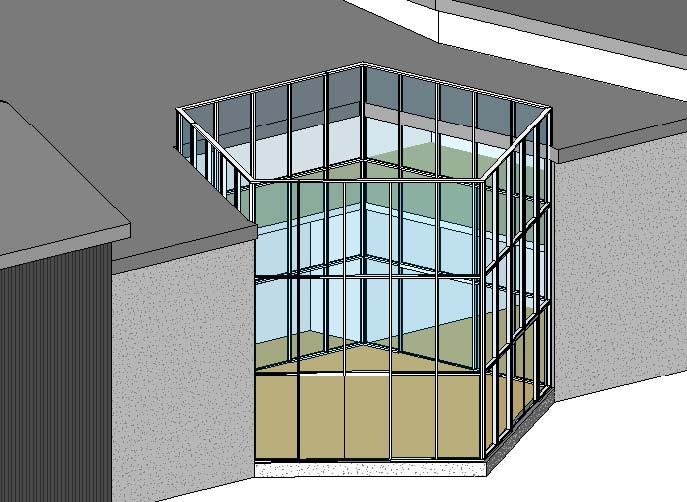
Sloped wall joined to sloped roof ok so here is my conceptual mass that i used to generate the walls by face and roof which is actually a wall works fine for the most part with wall by face and i ve sorted out the joints for the most part but here revit does somthing weird how do i make the roof s end flush with the wall. Revit roof slope can seem complicated at first glance but by learning a few critical features you can create any roof shape you desire. Here is a mass shown next to the in place sloped wall. Whether you want a double gable roof with 6 pyramid shaped dormers or a simple gambrel roof the basics remain the same.
By default a wall in revit architecture displays its assigned height regardless of whether it connects with the associated roof. If your wall crosses both parts of the mansard you might need to attach the wall twice once to each slope. Define a profile by sketch confirm the profile 6. A regular revit wall can then conform itself to the mass.
Then you pick the roof you want to attach it to. You ll need to manually mark it as attaching to the roof. In the drawing area select the walls to detach. Find out how to attach walls to roofs in revit architecture 2015.
Define path confirm path 5. Steps in the video. Click modify walls tab modify wall panel detach top base. Using the wall by face workflow requires a mass element be created first.

Https Encrypted Tbn0 Gstatic Com Images Q Tbn 3aand9gcrxs6ugd7r4lknf5wj0cbyrvk4k5xssern52g Usqp Cau

Revit Architecture Roof By Footprint Bimscape Roofing Fibreglass Roof Roof Design

Enclosure Details Baum Architecture Curtain Wall Detail Roof Detail Wall Section Detail

Create Roof Using Curtain Wall Youtube Parametric Architecture Curtain Wall Panel Curtains

Revit Foba Curved Walls Roof By Extrusion Youtube

8 Tips To Create Sloped Roofs In Revit Revit Pure Roof Shapes Roof Pure Products

Youtube Perforated Brick Wall Revit Tutorial Revit Architecture Architecture Program
Revitcity Com Difficulty With Wall And Roof Ends

Creating Walls That Follow Site Topography Contours In Revit Revit Tutorial Topography Site

Revit Tutorials Roofs Youtube

Sloped Railings Fences Using Adaptive Components In Revit Revit Tutorial Components Fence

Revit Tutorial Constant Slope Rigging Family Rigid Insulation Therevitkid Com Tutorials Tips Products And Revit Tutorial Rigid Insulation Tutorial

How To Make Curved Roof In Revit Youtube Roofing Roof Surface

Several Residential Commercial Buildings As Well As Other Wood Framed Roofs Contain Clipped Gable Ends Also Know Building Information Modeling Roof Gable Roof

Dynamo Simple Practical Examples Draw A Revit Wall

Angled Walls Added House Design Design Bar Chart

Wall Structure Material Diagram In Revit Tutuorial Youtube Revit Tutorial Facade Architecture Wall Board

Spanish Roof Tile In Revit With Download Link Revit Tutorial Roof Tiles Revit Architecture
Https Encrypted Tbn0 Gstatic Com Images Q Tbn 3aand9gcqt Jag1pa Hofhz 59fqg8i0feamtfelr0xlmsrdq6chiqvxbg Usqp Cau

Modern House In Revit Tutorial Revit Tutorial Revit Architecture Modern House Design

Revit 2013 Wall Layer Functions Batt Insulation Fiberglass Batts Wall

Pin By Simon Hayes On Revit In 2020 Revit Architecture Autodesk Revit Architecture
Solved Curtain Wall Roof Autodesk Community Revit Products

How To Create A Pyramid Shape In Revit Pyramids Shapes Create

Solved Attaching Wall To A Roof Problem Autodesk Community Revit Products

Vitral A74 Roof Glazing As Bim Object For Revit Youtube

How To Model Roof Construction In Revit Roof Construction Revit Tutorial Architecture Building Design

Autodesk Revit Architecture 2014 Tutorial Basic Wall Revit Architecture Autodesk Revit Revit Tutorial

Bsi 050 Parapets Where Roofs Meet Walls Parapet Flat Roof Roof Design

Living Roof Construction Section Drawing Google Search Roofingarchitecture Roof Architecture Roof Detail Parapet

Decals In Revit Paneling How To Apply Projects

3 Revit Tutorial Creating Wood Slat Walls Youtube Wood Slat Wall Slat Wall Wall Yoga

Revit Sloped Wall Buildings Google Search Slopes Google Search Wall

Revit Roof Tip 5 Activate Overhang On Picked Walls Roof Youtube

16 Creating Complex Roof In Revit Architecture Hip Roofs Youtube Revit Architecture Hip Roof Architecture

Rafter Framing W Autodesk Revit Extensions Autodesk Revit Revit Architecture Revit Tutorial

This Revit Video Tutorial Sheds Light On Automatic Segmentation Of Precast Walls In Revit With Split Command It Is Possible To Wall Revit Family Segmentation

Five Minutes Of Roof Sloping Roof Slopes

Parapet Box Gutter Box Gutter Wikipedia Box Gutter Parapet Butterfly Roof

Revit Architecture Applying Skirting Using An Integrated Wall Sweep Revit Architecture Skirting Architecture

Revit 3d Tutorial How To Create Your 3d Revit Plan View Youtube 3d Tutorial Wall Tutorial

Custom Ceiling Design In Revit Tutorial Revit Tutorial Ceiling Design Revit Architecture

